
How Do You Test Soil Texture With a Jar, and What Does Each Soil Need?
A simple jar test shows whether your soil is mostly sand, silt, or clay. Each texture fails differently, so the right fall fix depends on how quickly water moves, how long nutrients stay available, and whether the surface seals or cracks.
October 2, 2026
By Valeria Navarro
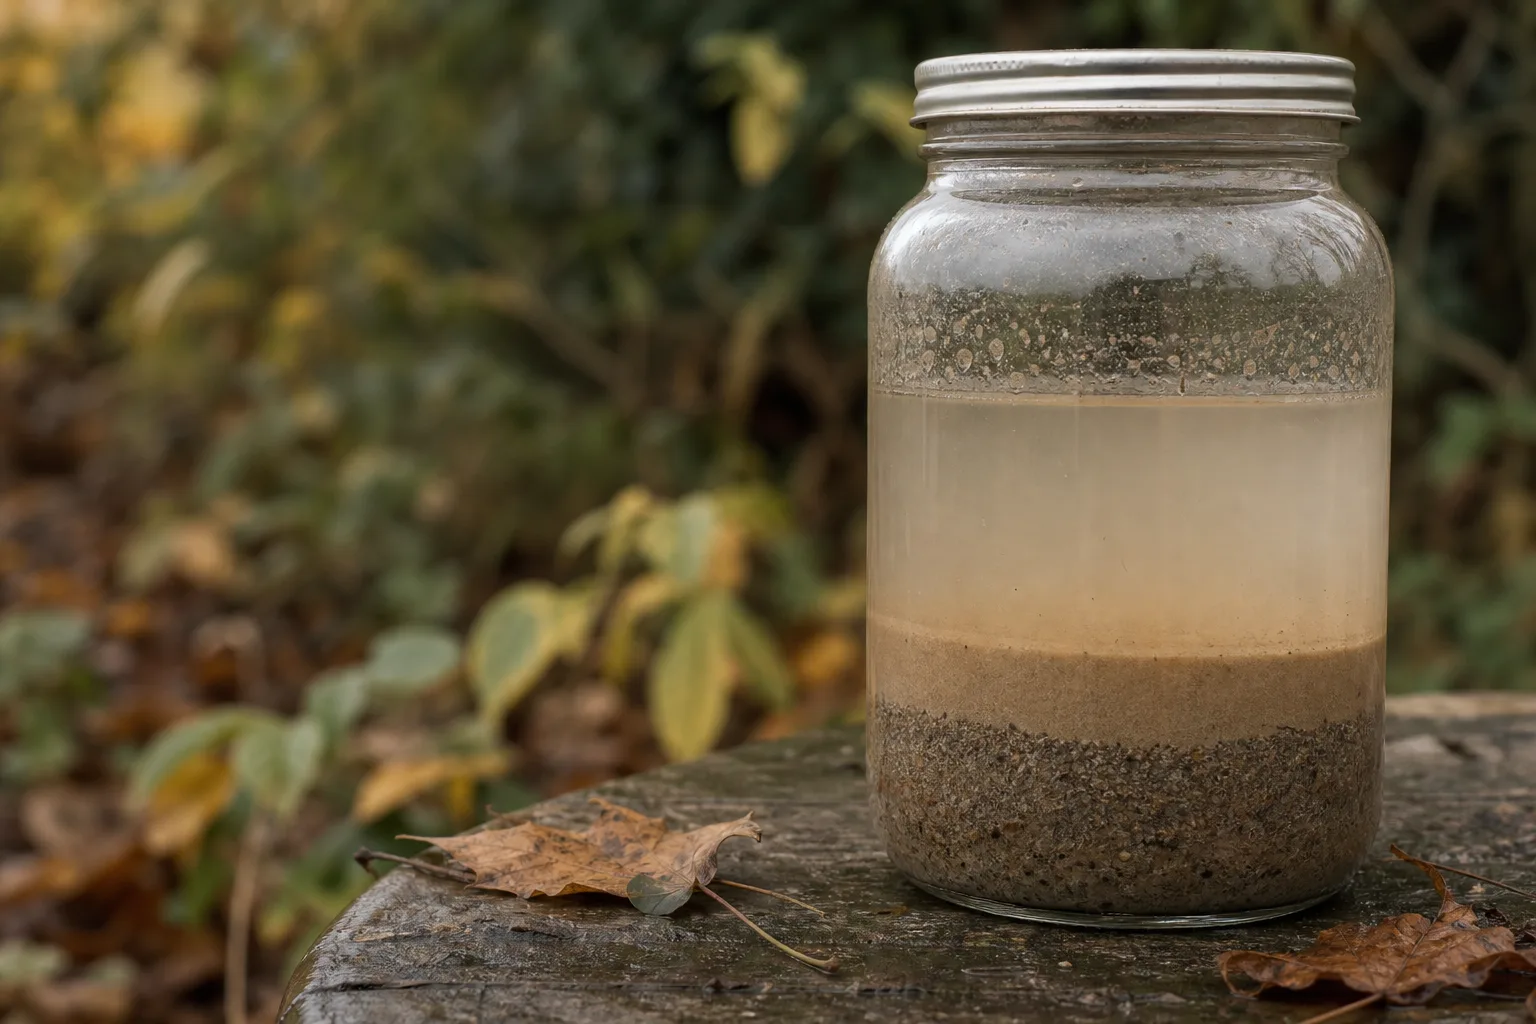
A jar test gives you a quick estimate of whether your soil is mostly sand, silt, or clay, and I would do it before buying amendments this fall. Sand loses water and nutrients, silt compacts and crusts, and clay holds water until roots sulk, so each texture needs a different repair rather than one universal bag of compost.
What does a soil jar test tell you?
A soil jar test gives a rough visual estimate of soil texture by separating sand, silt, and clay according to how quickly each particle settles in water. Sand drops first, silt follows, and clay lingers longest, so the layers show which texture dominates your sample. It is useful for choosing a first fix, not for laboratory precision. The basic jar method is described here.
Texture is not the same thing as fertility. A sandy jar can still belong to a fertile bed, while a clay jar can be depleted or compacted. Texture tells you how the soil handles water and nutrients, which is the part that determines whether your fall watering disappears, puddles, or sits in a stubborn middle zone.
Formal soil work may determine texture with a hydrometer rather than a kitchen jar, as one soil study describes for sand, silt, and clay measurement here. For a homeowner, the jar test is a sensible screening tool.
How do you do a soil jar test this fall?
Collect soil from several spots in the bed, remove stones and roots, place it in a clear jar, add water and one drop of dish soap, then shake hard. Let the jar sit undisturbed while sand settles first, silt settles next, and clay remains suspended longer. The test is fast, inexpensive, and imperfect, but it can reveal the broad texture pattern before you amend.
Take samples from the upper garden soil, not one crusty lump from the path. Mix small scoops from three to five locations in a clean bucket, then fill the jar about one-third full with that mixed soil and nearly to the top with water.
Dish soap helps disperse the particles, but it is not a soil treatment. Use one drop, not a squeeze, because extra soap creates foam that makes the layers harder to see and leaves you with a less useful picture. That is the trade-off of this method: it is accessible, but the estimate depends on a clean sample and careful observation.
Mark the waterline and watch at several points. Check after one minute for the sand layer, after a few hours for the silt, and again after roughly 24 to 48 hours for the clay. Do not keep shaking the jar after the first settling period, or you reset the test.
How do you read the sand, silt, and clay layers?
Read the jar by comparing the thickness of the settled layers, not by searching for one magic color or a perfect percentage. A thick bottom layer means more sand, a middle layer means more silt, and a cloudy upper layer that settles slowly means more clay. Mixed layers point toward a loam-like soil, which usually supports the widest range of plants.
Sand feels gritty between your fingers. Silt feels smooth and floury, especially when damp. Clay feels sticky when wet and can form a ribbon or hard lump, but the jar gives you a clearer picture of proportions than a quick pinch test.
Everyone says “loam is best.” In practice, a balanced texture only helps if the soil is not compacted and the water is moving through it reasonably well. A loamy bed can still fail after foot traffic, while a sandy bed can grow beautifully if you replace moisture and nutrients often.
For a second check, dig a small hole, fill it with water, let it drain, refill it, and time the second drain. That infiltration test can suggest compaction, clay, or a restrictive layer when drainage is slow, though it still will not identify texture as neatly as the jar.
What does sandy soil need after a jar test?
Sandy soil needs more help holding moisture and nutrients because it drains quickly and warms quickly. Add generous organic matter such as compost or mulch, water more frequently in smaller amounts, and choose low-phosphorus fertilizer so nutrients are less likely to leach away. The honest trade-off is more maintenance, because sand rarely forgives a missed watering.
Spread compost over the bed in a moderate layer and work it into the planting zone rather than making a rich pocket around one root ball. Compost improves the soil, but it breaks down, so it is not a one-time cure. Too much at once can create a soft, uneven bed that dries differently from the surrounding soil.
Mulch slows evaporation, but mulch is not a substitute for checking the soil. Keep it on the surface and away from stems. Thick mulch can stay wet against plant tissue and can hide a dry root zone underneath, so lift it with your fingers before watering.
Low-phosphorus fertilizer reduces the risk of adding a nutrient that can move through sandy soil unnecessarily, but fertilizer is still a salt load. Use only the label rate, and do not fertilize a dry bed. Fall is a good time to improve the soil structure, not an excuse to pour food on stressed roots.
What does silty soil need after a jar test?
Silty soil needs organic matter, gentle irrigation, and occasional loosening because its smooth particles can compact or form a surface crust when structure is weak. Mix organic matter into the bed, water with a soft flow that does not strike the surface, and use a garden fork when the soil is workable. Its trade-off is fertility with fragility.
Compost helps silt particles form larger aggregates, which creates more stable pore space. It also needs to be mixed through the root zone rather than left as a thin decorative layer. Compost is useful, but it is not magic soil foam, and repeated heavy applications can leave the bed uneven or nutrient-rich in patches.
Gentle irrigation matters most after sowing or transplanting. A hard spray can seal the surface, so use a low-flow setting or water slowly enough that the surface does not puddle. The trade-off is time. Slow watering takes longer, but repairing a sealed crust takes longer still.
Use a garden fork only when the soil is moist enough to crumble. Do not churn wet silt into mud or walk across the bed while it is saturated. Forking improves air space temporarily, but it cannot compensate for repeated traffic, so place stepping stones where you need to reach the bed.
What does clay soil need after a jar test?
Clay soil needs organic matter, careful watering, and improved drainage because it holds water and nutrients well but can drain slowly and crack as it dries. Add organic matter, use mulch to moderate drying, and consider coarse material only as part of a broader drainage plan. Clay’s trade-off is that it stores resources well but punishes overwatering.
Here in Austin, a thin soil layer over limestone or dense alkaline clay can behave like two different gardens in the same bed. Blackland Prairie clay may crack open by August, then hold water after a heavy fall storm. That swing is why I watch the soil, not just the calendar.
Coarse sand or grit may improve drainage in some situations, but small amounts of sand mixed into heavy clay can make a dense, concrete-like blend. If you use coarse material, incorporate it through the bed rather than dumping a narrow layer at the bottom. The trade-off is labor, and the result depends on enough volume to change the whole root zone.
Mulch moderates drying and cracking, but it does not correct a bed that stays waterlogged. Keep a consistent surface layer and check below it before watering. If the soil is already saturated, more water is not kindness. It is just a wet apology to roots that need air.
Which soil texture is this advice for, and who should ignore it?
This advice suits homeowners who want a fast fall diagnosis before adding compost, changing irrigation, or choosing fertilizer. It is especially useful for new beds, raised beds with unknown fill, and Austin gardens where clay, limestone, and imported soil can sit within a few steps. Ignore the jar test for contamination questions or precise laboratory decisions.
Use it if one bed dries by lunchtime while another stays wet for days. Use it if seedlings wash out after irrigation or if the surface turns hard before roots establish. A jar can help you stop treating every garden problem as a fertilizer problem.
Do not use the jar test as a complete soil analysis. It does not tell you pH, salinity, nutrient levels, or whether a buried layer blocks drainage. It also does not replace professional testing where construction fill, chemical spills, or unusual plant damage raises a safety concern.
If your bed is small, take one composite sample and test it. If your property changes from caliche to clay to imported topsoil, test separate areas. You want an answer about the soil where the roots actually grow, not an average that hides the trouble.
How do sand, silt, and clay compare in the garden?
Sand, silt, and clay each fail differently, so I would choose the repair by failure rather than by texture label. Sand needs retention, silt needs structure, and clay needs drainage and moisture moderation. The chart below keeps the trade-offs visible instead of pretending one amendment fixes every bed.
| Soil texture | What usually fails first | What to do this fall | Honest downside |
|---|---|---|---|
| Sand | Moisture and nutrients disappear quickly | Add organic matter, mulch, water more frequently, and use low-phosphorus fertilizer | More frequent monitoring and watering |
| Silt | Surface crusting and compaction | Mix in organic matter, irrigate gently, and loosen only when workable | It can seal again under hard irrigation or foot traffic |
| Clay | Drainage slows and dry soil cracks | Add organic matter, use mulch, improve drainage carefully, and avoid waterlogging | Amendments take labor and poor watering can keep roots wet |
I would not buy a truckload of one amendment before testing. That is how homeowners spend money correcting the wrong failure. The plant database can help you match plants to the texture and moisture pattern you actually have.
If the bed is new or the layout is confusing, sketch where water collects, where the soil cracks, and where the surface crusts. You can also get a concept for your yard before spending on paths, beds, or irrigation that fight the soil instead of working with it.
What should you do with the jar test results this fall?
Use the result to make one measured change this fall, then watch the bed for four to six weeks. Add organic matter for structure, adjust irrigation to the texture, and use mulch to slow drying, but do not stack several major amendments at once. The best soil fix is the one you can observe and correct before spring planting.
Start with the water problem. If water disappears quickly, improve retention and check the bed more often. If water sits, repeat the infiltration test and look for compaction or a restrictive layer before watering again.
Next, improve the surface. Sandy soil benefits from organic matter and mulch. Silty soil benefits from gentle irrigation and protection from traffic. Clay benefits from mulch and careful moisture management, because breaking a dry clod into smaller dry clods is not the same as improving structure.
I learned this contrast the hard way after moving from my abuela’s Miami patio, where sandy fill drained before I finished watering, to Austin clay that can hold a storm and then set like a brick. I killed plants by watering on the schedule instead of reading the soil. Ahora, I test first, change one thing, and give the bed time to answer.
What is the easiest way to test soil texture at home?
The easiest home method is a jar test: shake mixed soil with water and one drop of dish soap in a clear jar, then let it settle without disturbing it. Sand forms the bottom layer first, silt settles next, and clay settles last. The test gives a rough texture estimate, not a full laboratory soil analysis.
How long should a soil jar test sit?
A soil jar test should sit for at least 24 hours, and cloudy clay may need 48 hours before the upper layer becomes easier to read. Check the jar after about one minute for sand, after a few hours for silt, and again the next day for clay. Do not shake it again between observations.
What does sandy soil need after a jar test?
Sandy soil needs organic matter, mulch, more frequent watering, and careful fertilizer use because it drains quickly and can lose nutrients and moisture. Use a low-phosphorus fertilizer at the label rate rather than adding extra. The trade-off is ongoing attention, since sand can dry faster than a busy homeowner expects.
What does silty soil need after a jar test?
Silty soil needs organic matter to improve aggregation, gentle irrigation to prevent surface sealing, and occasional aeration with a garden fork when the soil is workable. Avoid walking on saturated soil because it compacts easily. Silt can be fertile, but its smooth structure becomes a problem when water or traffic is too forceful.
What does clay soil need after a jar test?
Clay soil needs organic matter, mulch, and careful watering because it holds water and nutrients but drains slowly and cracks as it dries. Improve drainage without mixing a small amount of sand into clay, which can create a dense blend. Clay rewards patience, but it punishes frequent overwatering.
Can a jar test replace professional soil testing?
A jar test cannot replace professional soil testing because it estimates texture but does not measure pH, salinity, nutrient levels, or possible contamination. Use it to guide first steps for ordinary garden beds. If construction fill, chemical exposure, or unexplained plant damage is involved, send a proper sample to a qualified laboratory instead.
Want a plan for your own yard?
Tell us the space and we will put a planting plan together for it. Start at get my concept, or browse what actually grows where you are over on plants.
Frequently asked questions
What is the easiest way to test soil texture at home?
The easiest home method is a jar test: shake mixed soil with water and one drop of dish soap in a clear jar, then let it settle without disturbing it. Sand forms the bottom layer first, silt settles next, and clay settles last. The test gives a rough texture estimate, not a full laboratory soil analysis.
How long should a soil jar test sit?
A soil jar test should sit for at least 24 hours, and cloudy clay may need 48 hours before the upper layer becomes easier to read. Check the jar after about one minute for sand, after a few hours for silt, and again the next day for clay. Do not shake it again between observations.
What does sandy soil need after a jar test?
Sandy soil needs organic matter, mulch, more frequent watering, and careful fertilizer use because it drains quickly and can lose nutrients and moisture. Use a low-phosphorus fertilizer at the label rate rather than adding extra. The trade-off is ongoing attention, since sand can dry faster than a busy homeowner expects.
What does silty soil need after a jar test?
Silty soil needs organic matter to improve aggregation, gentle irrigation to prevent surface sealing, and occasional aeration with a garden fork when the soil is workable. Avoid walking on saturated soil because it compacts easily. Silt can be fertile, but its smooth structure becomes a problem when water or traffic is too forceful.
What does clay soil need after a jar test?
Clay soil needs organic matter, mulch, and careful watering because it holds water and nutrients but drains slowly and cracks as it dries. Improve drainage without mixing a small amount of sand into clay, which can create a dense blend. Clay rewards patience, but it punishes frequent overwatering.
Can a jar test replace professional soil testing?
A jar test cannot replace professional soil testing because it estimates texture but does not measure pH, salinity, nutrient levels, or possible contamination. Use it to guide first steps for ordinary garden beds. If construction fill, chemical exposure, or unexplained plant damage is involved, send a proper sample to a qualified laboratory instead.
Free, no obligation
Ready to design your dream landscape? Start here.
Tell us where you are and we will start a free profile for you, with plants that actually survive your climate and a real sense of what the build would cost.